
Build a Simple Node.js, Express, and MongoDB Driver App
In this exercise we will build a very small Node.js application that uses:
expressdotenvmongodbejscors
For development we will use only:
nodemon
The goal is to keep everything as simple as possible while still following good JavaScript practices:
- use ES modules
- keep secrets in
.env - connect to MongoDB once and reuse the connection
- use
async/await - return JSON for API routes
- render one simple EJS page with data from MongoDB
Table of Contents
Open Table of Contents
- What We Will Build
- Prerequisites
- Step 1 - Create the project
- Step 2 - Install the packages
- Step 3 - Configure package.json
- Step 4 - Create server.js
- Step 5 - Create the environment file
- Step 6 - Connect to MongoDB
- Step 7 - Build the Express app
- Step 8 - Add routes for saving and reading data
- Step 9 - Create the EJS screen
- Step 10 - Run the project
- Final Code
- Conclusion
What We Will Build
We will build a tiny app with:
- one backend file:
server.js - one view file:
views/index.ejs - one MongoDB collection:
messages
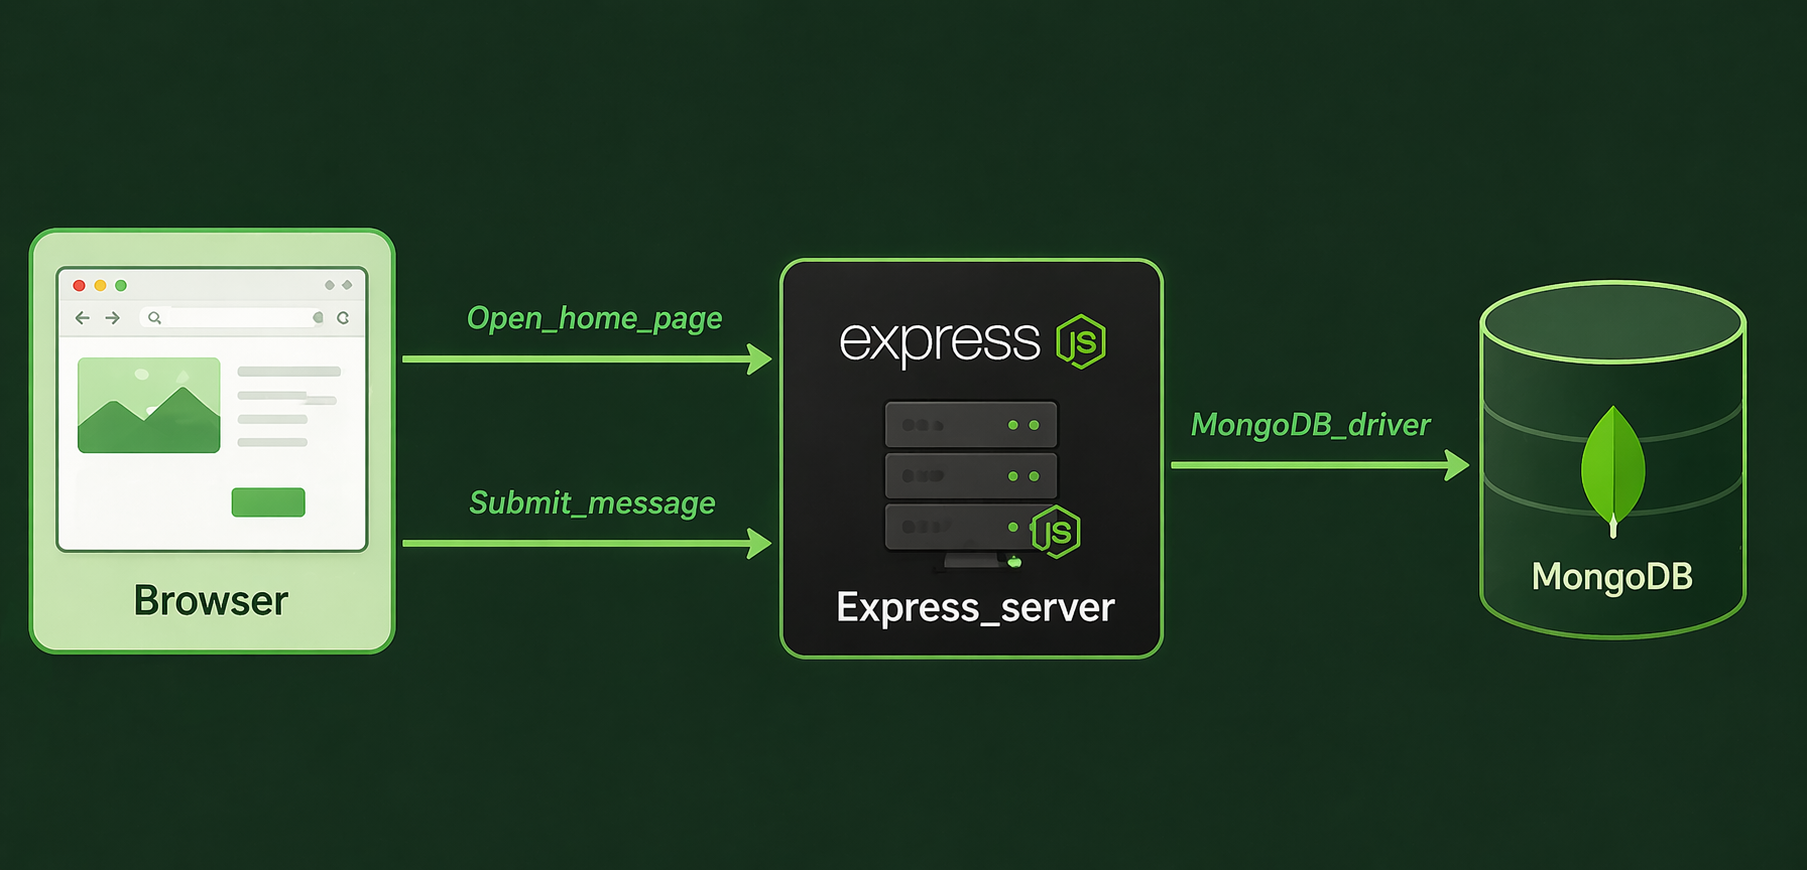
The app will do three simple things:
- Show all messages from MongoDB on an HTML page.
- Let us add a new message with a form.
- Expose a JSON route so we can also read the data as an API.
Here is the basic flow:
Prerequisites
Before starting, make sure you have:
- Node.js installed
- a running MongoDB server
If you still need to prepare MongoDB, these posts are a good starting point:
For this tutorial we will assume that MongoDB is available locally on:
mongodb://127.0.0.1:27017
If you are using MongoDB Atlas, you can use your Atlas connection string instead.
Step 1 - Create the project
Create a new folder for the project and initialize it with npm:
mkdir simple-express-mongo-app
cd simple-express-mongo-app
npm init -y
After this command, npm creates a package.json file for us.
At this point the project is very small:
simple-express-mongo-app/
  package.json
Step 2 - Install the packages
Now install the exact packages for this exercise.
Install the runtime dependencies:
npm install express dotenv mongodb ejs cors
Install the development dependency:
npm install -D nodemon
That is all we need.
Step 3 - Configure package.json
We want two important changes in package.json:
- Make the project use ES modules with
"type": "module". - Add
startanddevscripts.
Update your package.json so it looks like this:
{
  "name": "simple-express-mongo-app",
  "version": "1.0.0",
  "description": "A simple Express app with MongoDB driver and EJS",
  "main": "server.js",
  "type": "module",
  "scripts": {
    "start": "node server.js",
    "dev": "nodemon server.js"
  },
  "keywords": [],
  "author": "",
  "license": "ISC"
}
Why do we add "type": "module"?
Because then we can use modern JavaScript imports like this:
import express from "express";
instead of:
const express = require("express");
We also add two scripts for a reason:
npm run devstarts the app withnodemon, so the server restarts automatically while we are learning and editing.npm startruns plain Node.js, which is the simpler command to use when we just want to run the finished app.
Step 4 - Create server.js
Now create the first backend file:
touch server.js
This file will hold all backend logic for this small project.
Later we will place everything here:
- configuration
- MongoDB connection
- Express setup
- routes
- app startup
Step 5 - Create the environment file
Create a .env file in the project root:
touch .env
Add the following values:
PORT=3000
MONGODB_URI=mongodb://127.0.0.1:27017
DB_NAME=learning_mongodb
COLLECTION_NAME=messages
This keeps configuration outside the code.
We do this so the code stays reusable. If later you change the database name, port, or connection string, you only update the .env file instead of editing the JavaScript source.
Now create a .gitignore file too:
touch .gitignore
Add this content:
node_modules
.env
This is important because we do not want to commit dependencies or secrets.
This is especially important for MONGODB_URI. If you use MongoDB Atlas, that value can contain credentials, so it should stay out of git.
At this point your project can look like this:
simple-express-mongo-app/
  .env
  .gitignore
  package.json
  server.js
Step 6 - Connect to MongoDB
Now let us start building server.js.
6.1 Add the imports
Start with these imports:
import express from "express";
import cors from "cors";
import dotenv from "dotenv";
import { MongoClient } from "mongodb";
import path from "path";
import { fileURLToPath } from "url";
Here is what each import does:
expresscreates the web servercorsallows cross-origin requestsdotenvloads variables from.envMongoClientis the official MongoDB driver clientpathandfileURLToPathhelp us resolve theviewsfolder when using ES modules
6.2 Load the environment variables
Add:
// Load values from .env into process.env
dotenv.config();
6.3 Read the config values
Next, read the values from process.env:
// Use environment variables so the app is easy to reconfigure
const PORT = Number(process.env.PORT) || 3000;
const MONGODB_URI = process.env.MONGODB_URI;
const DB_NAME = process.env.DB_NAME || "learning_mongodb";
const COLLECTION_NAME = process.env.COLLECTION_NAME || "messages";
6.4 Validate the MongoDB connection string
Before we try to connect, we should make sure the URI exists:
// Stop immediately if the database connection string is missing
if (!MONGODB_URI) {
  throw new Error("Missing MONGODB_URI in the .env file.");
}
This is a simple but good practice. It helps us fail early with a clear message.
6.5 Create the MongoDB client
Now create the client:
// Create one MongoDB client for the whole app
const client = new MongoClient(MONGODB_URI);
6.6 Connect once and reuse the database
For a small app, a simple and clean approach is:
- create one
MongoClient - connect once when the server starts
- reuse the collection in all routes
That can look like this:
// Connect when the app starts
await client.connect();

// Select the database we want to use
const db = client.db(DB_NAME);

// Select the collection where we will store messages
const messagesCollection = db.collection(COLLECTION_NAME);
This is much better than opening a brand new database connection inside every route.
Why? Because opening new connections again and again is slower, wastes resources, and makes the code harder to reason about. For a simple Express app, one shared client is a clean default.
Step 7 - Build the Express app
Now create and configure the Express app.
7.1 Create the app
// Create the Express application
const app = express();
7.2 Add middleware
We need a few middlewares:
// Allow requests from other origins if we later call this API from another frontend
app.use(cors());

// Parse JSON request bodies
app.use(express.json());

// Parse HTML form submissions
app.use(express.urlencoded({ extended: true }));
Why do we use them?
cors()lets other frontends call the API if neededexpress.json()reads JSON request bodiesexpress.urlencoded()reads form submissions from the EJS page
7.3 Configure EJS
Because this project uses ES modules, we define the current directory manually:
const __filename = fileURLToPath(import.meta.url);
const __dirname = path.dirname(__filename);
Then configure EJS:
// Tell Express to render .ejs templates
app.set("view engine", "ejs");

// Tell Express where the view files live
app.set("views", path.join(__dirname, "views"));
We use EJS here because it is one of the simplest ways to render server-side HTML with data from MongoDB. That makes it perfect for a beginner tutorial.
Step 8 - Add routes for saving and reading data
We will keep the routes extremely simple.
8.1 Route for the homepage
This route reads data from MongoDB and renders the EJS file:
app.get("/", async (req, res) => {
  // Read all messages, newest first
  const messages = await messagesCollection
    .find()
    .sort({ createdAt: -1 })
    .toArray();

  // Pass the data into views/index.ejs
  res.render("index", { messages });
});
We render HTML on / because it gives us a visible result right away. A beginner can open the browser, submit a form, and immediately see MongoDB data on the screen.
8.2 Route for inserting data
This route receives a message from the HTML form and saves it:
app.post("/messages", async (req, res) => {
  // Clean up the user input a little
  const message = req.body.message?.trim();

  if (!message) {
    return res.status(400).send("Message is required.");
  }

  // Save a document in MongoDB
  await messagesCollection.insertOne({
    message,
    createdAt: new Date()
  });

  // Go back to the home page after saving
  res.redirect("/");
});
We store createdAt so the data becomes more realistic. Even in very small demos, timestamps are useful because they let us sort records and understand when something was created.
8.3 JSON route for reading data
This route returns the stored messages as JSON:
app.get("/api/messages", async (req, res) => {
  // Load the same data for API consumers
  const messages = await messagesCollection
    .find()
    .sort({ createdAt: -1 })
    .toArray();

  // Return raw JSON instead of rendering HTML
  res.json(messages);
});
This route is helpful because it shows that one app can serve both server-rendered pages and API responses. That is a very common pattern in Node.js projects.
8.4 Add small error handling with try/catch
Since the routes are asynchronous, it is a good idea to wrap them in try/catch.
For example:
app.get("/", async (req, res) => {
  try {
    const messages = await messagesCollection
      .find()
      .sort({ createdAt: -1 })
      .toArray();

    res.render("index", { messages });
  } catch (error) {
    console.error("Error loading messages:", error);
    res.status(500).send("Could not load messages.");
  }
});
We will use the same pattern in the final version below.
Step 9 - Create the EJS screen
Create a views folder and an index.ejs file:
mkdir views
touch views/index.ejs
Now add this content:
<!DOCTYPE html>
<html lang="en">
  <head>
    <meta charset="UTF-8" />
    <meta name="viewport" content="width=device-width, initial-scale=1.0" />
    <title>Messages</title>
    <style>
      body {
        font-family: Arial, sans-serif;
        max-width: 720px;
        margin: 40px auto;
        padding: 0 16px;
      }

      form {
        margin-bottom: 24px;
      }

      input,
      button {
        padding: 10px;
        font-size: 16px;
      }

      input {
        width: 70%;
      }

      ul {
        padding-left: 20px;
      }
    </style>
  </head>
  <body>
    <h1>Messages from MongoDB</h1>

    <!-- Simple form that submits a message to the Express route -->
    <form action="/messages" method="post">
      <input
        type="text"
        name="message"
        placeholder="Write a message"
        required
      />
      <button type="submit">Save</button>
    </form>

    <ul>
      <!-- Show a helpful message when the collection is empty -->
      <% if (messages.length === 0) { %>
        <li>No messages yet.</li>
      <% } %>

      <!-- Loop through all messages passed from Express -->
      <% messages.forEach((item) => { %>
        <li>
          <strong><%= item.message %></strong>
          <br />
          <small><%= new Date(item.createdAt).toLocaleString() %></small>
        </li>
      <% }) %>
    </ul>
  </body>
</html>
This page is intentionally simple:
- one form
- one list
- one loop over the MongoDB data
That is enough for a beginner project.
The page is not fancy, and that is intentional. The goal here is to understand the data flow first:
- the browser sends a form request
- Express receives it
- MongoDB stores the data
- Express reads the data back
- EJS renders it into HTML
Step 10 - Run the project
Now you can start the app:
npm run dev
If everything is correct, you should see a message that the app is running.
Then open:
http://localhost:3000
You can also test the JSON route:
http://localhost:3000/api/messages
If you want to insert data with an API tool instead of the HTML form, you can add this extra route:
app.post("/api/messages", async (req, res) => {
  try {
    const message = req.body.message?.trim();

    if (!message) {
      return res.status(400).json({ error: "Message is required." });
    }

    const result = await messagesCollection.insertOne({
      message,
      createdAt: new Date()
    });

    res.status(201).json({
      message: "Message saved successfully.",
      insertedId: result.insertedId
    });
  } catch (error) {
    console.error("Error saving message:", error);
    res.status(500).json({ error: "Could not save message." });
  }
});
Then test it with:
curl -X POST http://localhost:3000/api/messages \
  -H "Content-Type: application/json" \
  -d '{"message":"Hello from curl"}'
Final Code
Below is one clean final version of server.js with everything together in one file.
import express from "express";
import cors from "cors";
import dotenv from "dotenv";
import { MongoClient } from "mongodb";
import path from "path";
import { fileURLToPath } from "url";

// Load values from the .env file
dotenv.config();

// Read config from the environment so the app is easy to move between machines
const PORT = Number(process.env.PORT) || 3000;
const MONGODB_URI = process.env.MONGODB_URI;
const DB_NAME = process.env.DB_NAME || "learning_mongodb";
const COLLECTION_NAME = process.env.COLLECTION_NAME || "messages";

// Fail fast if the MongoDB URI is missing
if (!MONGODB_URI) {
  throw new Error("Missing MONGODB_URI in the .env file.");
}

// ES modules do not provide __dirname automatically, so we build it ourselves
const __filename = fileURLToPath(import.meta.url);
const __dirname = path.dirname(__filename);

// Create one MongoDB client and reuse it across the whole app
const client = new MongoClient(MONGODB_URI);

// Connect before starting the server so routes have a working database connection
await client.connect();
console.log("Connected to MongoDB.");

// Select the database and collection we will use
const db = client.db(DB_NAME);
const messagesCollection = db.collection(COLLECTION_NAME);

// Create the Express app
const app = express();

// Middleware
app.use(cors());
app.use(express.json());
app.use(express.urlencoded({ extended: true }));

// Tell Express to use EJS and where to find the templates
app.set("view engine", "ejs");
app.set("views", path.join(__dirname, "views"));

app.get("/", async (req, res) => {
  try {
    // Read all messages, newest first
    const messages = await messagesCollection
      .find()
      .sort({ createdAt: -1 })
      .toArray();

    // Render the HTML page with the data
    res.render("index", { messages });
  } catch (error) {
    console.error("Error loading messages:", error);
    res.status(500).send("Could not load messages.");
  }
});

app.post("/messages", async (req, res) => {
  try {
    // Read the form field and remove extra whitespace
    const message = req.body.message?.trim();

    if (!message) {
      return res.status(400).send("Message is required.");
    }

    // Insert one document into MongoDB
    await messagesCollection.insertOne({
      message,
      createdAt: new Date()
    });

    // Redirect so the user sees the updated list
    res.redirect("/");
  } catch (error) {
    console.error("Error saving message:", error);
    res.status(500).send("Could not save message.");
  }
});

app.get("/api/messages", async (req, res) => {
  try {
    // Return the same data as JSON for API usage
    const messages = await messagesCollection
      .find()
      .sort({ createdAt: -1 })
      .toArray();

    res.json(messages);
  } catch (error) {
    console.error("Error loading messages:", error);
    res.status(500).json({ error: "Could not load messages." });
  }
});

app.listen(PORT, () => {
  console.log(`Server is running on http://localhost:${PORT}`);
});

// Close the MongoDB connection cleanly when the app is stopped
process.on("SIGINT", async () => {
  await client.close();
  process.exit(0);
});
And here is the final views/index.ejs file again:
<!DOCTYPE html>
<html lang="en">
  <head>
    <meta charset="UTF-8" />
    <meta name="viewport" content="width=device-width, initial-scale=1.0" />
    <title>Messages</title>
  </head>
  <body>
    <h1>Messages from MongoDB</h1>

    <!-- Send form data to the POST /messages route -->
    <form action="/messages" method="post">
      <input
        type="text"
        name="message"
        placeholder="Write a message"
        required
      />
      <button type="submit">Save</button>
    </form>

    <ul>
      <!-- Render a fallback message when there is no data yet -->
      <% if (messages.length === 0) { %>
        <li>No messages yet.</li>
      <% } %>

      <!-- Render each MongoDB document as a list item -->
      <% messages.forEach((item) => { %>
        <li>
          <strong><%= item.message %></strong>
          <br />
          <small><%= new Date(item.createdAt).toLocaleString() %></small>
        </li>
      <% }) %>
    </ul>
  </body>
</html>
Conclusion
This project is small, but it already shows a very real Node.js workflow:
- initialize an npm project
- install only the packages we need
- use ES modules
- keep secrets in
.env - connect to MongoDB with the official driver
- build routes with Express
- render data with EJS
That is a strong starting point for beginners.
From here, a good next step would be to add:
- input validation
- delete and update routes
- a separated
dbfile - static CSS files
- MongoDB indexes for larger collections
For now, keeping everything simple and readable is the best choice.